On Sunday, I picked nineteen pounds of Rangpur limes. (I have the scratches to prove it. Rangpur trees are thorny!) I sent eleven pounds out to the folks who won them in last week’s giveaway. That left seven pounds to play with this week and about forty pounds still on the tree. That’s a lot of citrus — and here I am, not really in a marmalade mood. Good thing there’s citrus jam.
How do the two kinds of preserves differ from one another? A traditional marmalade is defined as fruit solids suspended in jelly. The fruit solids are usually (but not always) citrus slices, the jelly is as clear as possible, and there’s quite a bit of water on the ingredient list. A jam, on the other hand, is more rustic: fruit solids, sugar, and acid (usually added lemon juice) cooked down to a thick consistency. It may or may not contain discernible chunks of fruit.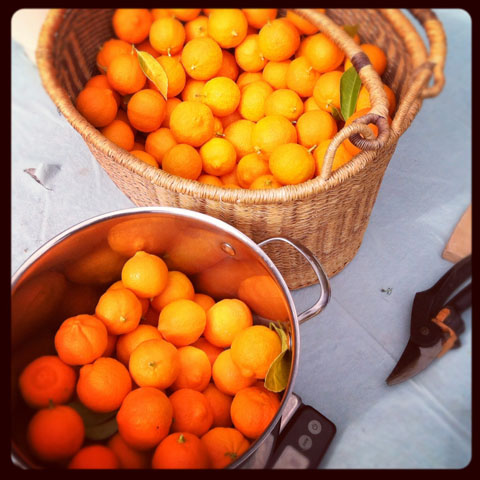
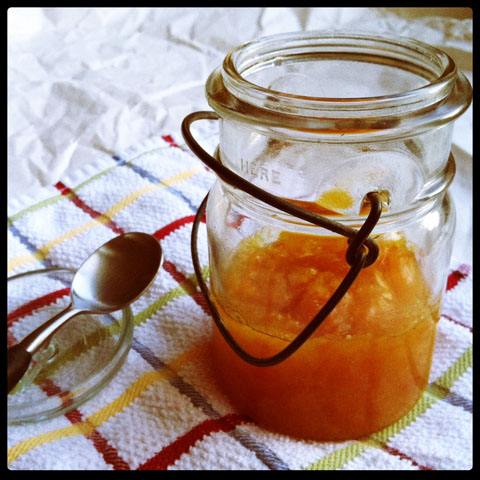
I like making citrus jams because they’re relatively simple — so much less fussy than marmalades. (You’ve gotta know I’m not knocking marmalade making. It’s a worthy art form, and I love it. Sometimes, though, you just want to take it easy.) This is the first time I’ve tried a Rangpur jam, and it turned out great. I asked Stewart how he liked it and he said, “It’s tart!” After that, he said it was good. I think this jam does a fine job of letting the fruit be itself, which is exactly what I wanted. He also said the set is perfect, which is true. Rangpurs are excellent setters.
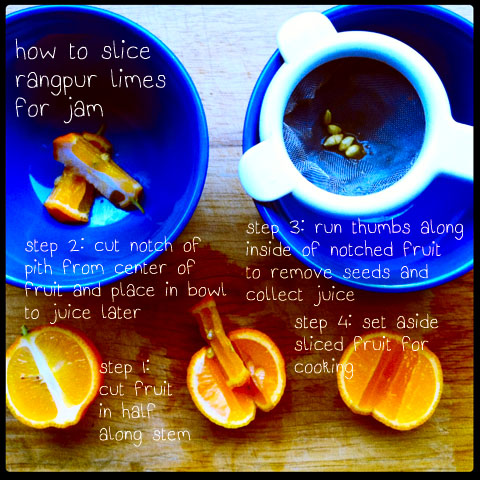
All in all, this is an easy recipe, and one that could be adapted to other kinds of citrus fruit. The only part that’s slightly complex is prepping the limes at the very start. Rangpurs are seedy little devils, so you have to go through a few steps to get them ready for cooking while at the same time reserving some juice. I describe the process below, but I also made a photo to help out.
I’m writing this out as a two-day process because it worked best for me to make the mixture in the evening, let it macerate in the fridge overnight, and finish the jam in the morning. That’s not strictly necessary. If you prefer, you can make the jam all in one go.
Rangpur Lime Jam
3 1/2 pounds Rangpur limes, prepared as below with juice reserved
juice of 2 Eureka lemons
4 cups refined white pure cane sugar
Day One
1. Cut and prep the limes as follows: Slice each lime lengthwise along the stem. Notch out the pith from the centers of the fruit, retaining those pithy centers so you can squeeze juice from them later. Then, using a small bowl with a strainer suspended over it, run your thumbs along the insides of the notched fruit to remove any seeds while collecting the juice in the bowl. Squeeze the lime centers over the strainer also. The goal is to collect as much juice as you can at the same time as you are preparing the finished lime halves for cooking. Set the bowl of juice aside.
2. Place the prepared lime halves in a large, nonreactive pot, and cover with cold water so they float freely. Bring to a boil, reduce the heat, and simmer until the limes are soft, about 1 hour. (When they are ready, it should be easy to pierce them with a skewer or fork.)
3. Drain the limes, reserving about 1 cup of cooking liquid. (Don’t worry if you accidentally dump the cooking liquid without reserving any of it. You can make it up with filtered water later, if necessary.)
4. Combine the cooked limes and the fresh juice from Step 1 in a VitaMix (that’s what I did) or food processor. Puree the fruit, but don’t completely liquefy it. I left small chunks of rind in the mixture. After processing, check to see that you have 4 cups of fruit mixture. If not, add reserved cooking liquid or filtered water so your mixture equals 4 cups.
5. Transfer the fruit mixture to a large glass or ceramic bowl, stir in the lemon juice and sugar, cover the bowl tightly, and let it rest in the fridge overnight. (About the sugar: When I tasted the mixture prior to cooking I thought, “Oh, this is way too sweet. I need to cut the sugar next time.” But as the jam cooked down and the Rangpurs released the edgy, tart muskiness that is their trademark, I was glad I’d used as much sugar as I did. How much to use is of course up to you, but a 1:1 ratio felt right to me for this recipe.)
Day Two
1. Sterilize your jars and put 5 teaspoons in the fridge to test the jam for doneness later.
2. Transfer the fruit mixture to your jam pan (I used an 11-quart stainless steel pan) and slowly bring to a boil, then reduce heat to medium-high and cook until the mixture reaches a jam-like consistency. You will have to stir very frequently to prevent sticking, and you may have to reduce the heat as the jam cooks down, so it doesn’t scorch. (For some reason, this reminded me a lot of cooking down a high-pectin plum jam, so if you know what that’s like, this process will feel familiar.) My jam was done in 18 minutes: Look for the point at which excess liquid has evaporated from the top of the mixture and the bubbles become smaller and more settled. I also started to see clear tracks at the bottom of the pan as I stirred.
To test your jam for doneness: Remove the mixture from the heat. Use one of your frozen spoons to scoop up a little bit of jam — not a whole spoonful. Return the spoon to the freezer and wait 3 minutes. Retrieve the spoon (it should be neither cold nor warm) and hold it vertically. If the mixture looks almost like it wants to run, but can’t, and it has substantially thickened, it’s done. Alternately, give the mixture a little push with your finger. If you see creases or wrinkles, it’s ready. If the jam runs, cook it for 2-3 minutes more (stirring all the while) then test again.
3. Remove the jam from the heat. Mine had no foam to skim but, if yours does, do that now. Pour the jam into hot jars, leaving 1/4-inch head space. Wipe the rims clean, apply lids, and process in a hot water bath for 5 minutes, adding time for your elevation if necessary.
Makes 4-5 half-pint jars.

